Learning Objectives

After completing this lesson, you'll be able to:

In this lesson, you will:


Learning Objectives

After completing this lesson, you'll be able to:

In this lesson, you will:


Resources

Directory Watch Triggers

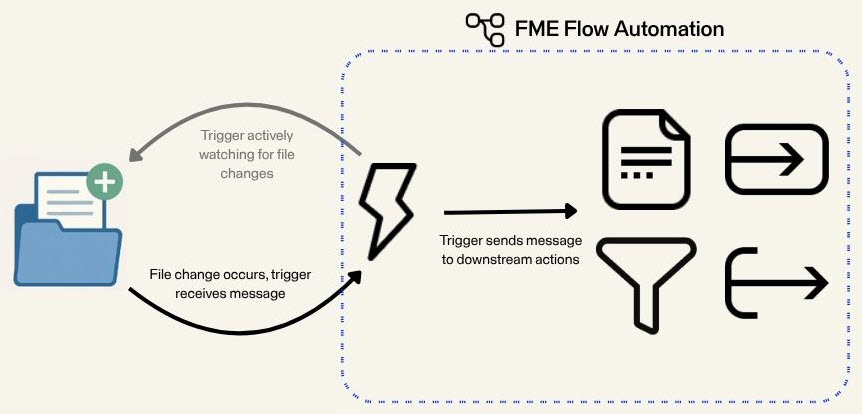
FME Flow's event-based triggers monitor events in external applications or within FME Flow and trigger an automation when a specific event occurs. Many of these triggers are directory watch triggers, in which FME Flow monitors a directory for an updated file or dataset. The Resource or Network Directory (updated) trigger monitors an FME Flow Resources or network drive (via a UNC path) for file additions, modifications, and deletions. Other common triggers include the FTP Directory (updated)Amazon S3 Bucket (updated), and Dropbox Directory (updated)

The primary use case for these triggers is to monitor a data storage location for any changes. Once a change occurs, FME Flow triggers the automation to run and passes the file to a workspace to process.  

Note

Some of these trigger protocols have corresponding external action protocols where FME Flow pushes files to the data storage location. For a complete list of trigger and action protocols, see our automations documentation

Automation Modes and Logs

Once you finish building your automation, you must start it to begin actively watching for file changes. FME Flow Automations has two running modes: Debug and Production. You should use Debug mode when building and testing your automation, and then use Production mode once it is built and ready to deploy and run without intervention. 

Debug Mode

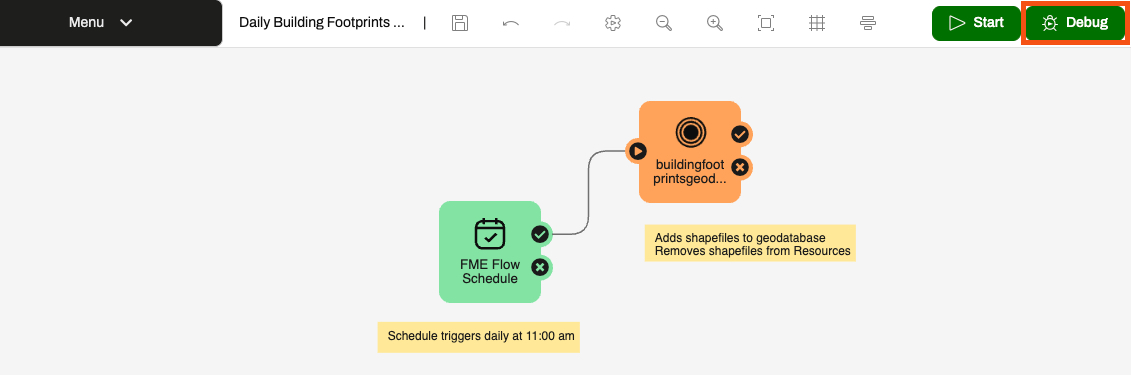
While you build and test your automation, you should use Debug mode. The Debug button in the top toolbar starts your automation in Debug mode. 
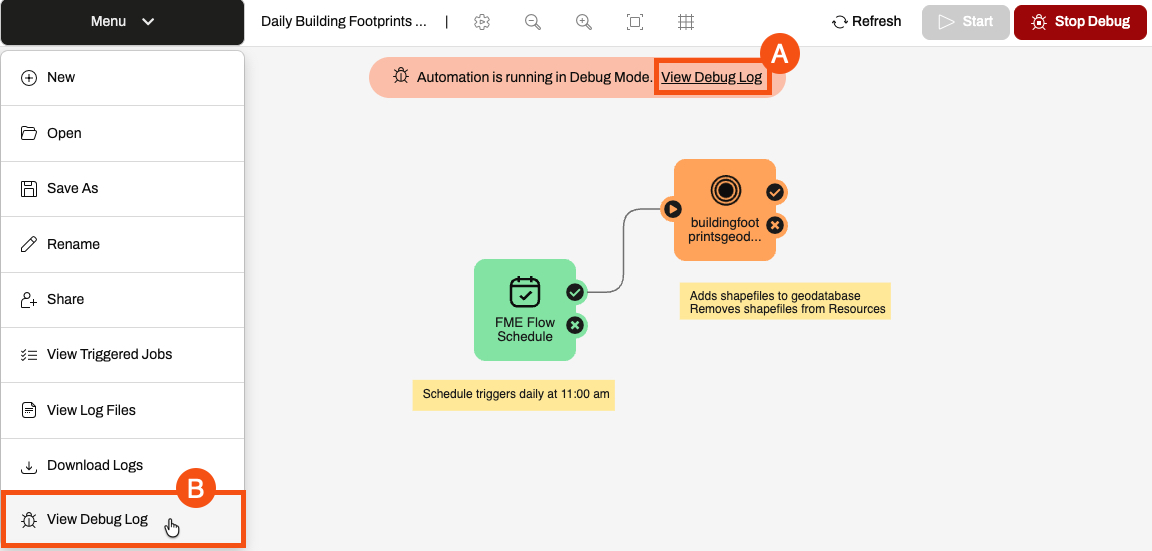
A warning message appears when you run an Automation in Debug mode. Once you confirm, a message appears on the automation canvas indicating that it is running in Debug mode. You can access the automation log file from the message (A) or from the View Debug Log option in the automations menu (B). While running in Debug mode, FME Flow temporarily stores the automations log files in the FME Flow database. FME Flow clears the log file each time the automation restarts and does not permanently store the files. 
Production Mode

Once you've built and tested your automation, the Start button begins running it in Production mode.
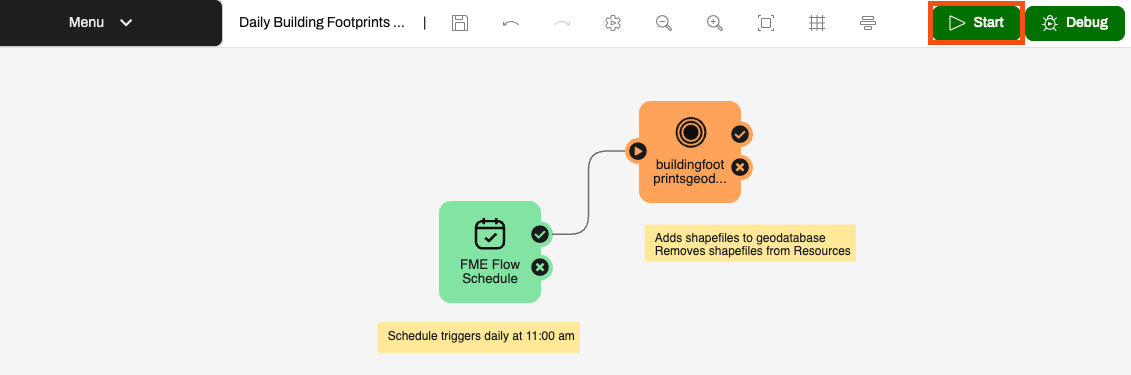
Again, the automations canvas displays a running message. 

To access the log files for your automation running in Production mode, use the automations Menu and select View Log Files or navigate to the logs through Resources > Logs > automations. 
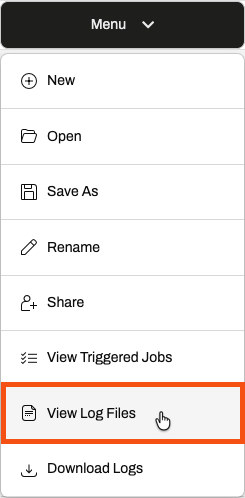
In Production Mode, FME Flow stores the logs for all Automations in Resources > Logs > automations. Additionally, FME Flow combines logs from all automations and separates the files by automation component. For internal and external actions, the log files begin with action_, and for triggers, the log files start with trigger_, and the trigger or action type follows each. For an Amazon S3 bucket trigger, the log file is called trigger_s3watch.log. For an Email external action, the log file is called action_email.log. You may need to filter the logs to find information specific to your automation, as FME Flow combines information from all automations triggered by the same action. The fmeautomations.log file is key and contains metadata about assembling, starting, stopping, and running automations. FME Flow saves the Production logs and removes them only according to the System Cleanup settings. 

The log files significantly differ between Debug and Production modes for FME Flow Automations. It's essential to understand them to avoid information loss and ensure you use the appropriate running mode for your automations. To summarize the differences, here are a few points:

Exercise

Jennifer, a GIS specialist, is working on a project to update a geodatabase with new shapefiles reflecting construction updates. She manually checks a Resource directory for new files daily, but knows she will save time and process the updates faster with an FME Flow Automation.

In this exercise, you will: 

1) Create Resources Folder

Note

You may skip this step if the BuildingUpdates folder already exists in Resources > Data. 

The first step is to create a Resources folder to upload the data.

2) Create Automation

  • Open Automations and select Create to create a new automation. 
    • A new automation opens with a ready-to-configure trigger. 

  • Optional: Expand the Menu options and select Hide Guides to remove the Next Action guides. 

3) Add Resource or Network Directory Trigger

  • Click the trigger icon to open the Trigger Details pane.
  • From the Trigger options, select Resource or Network Directory (updated)

  • For the Directory to Watch parameter, click the ellipsis button to browse FME Flow Resources.
  • Select the BuildingUpdates folder in the Data folder. 

  • Leave the Watch Subdirectories and Watch Folders parameters set to No.
    • You only need to monitor files directly in the BuildingUpdates folder.
  • For the Event to Watch parameter, deselect the Delete option. 
    • Your automation only needs to trigger for new files or file updates. You do not need to update the database if you delete files from this directory.
  • Change the Poll Interval to 5 seconds
  • Click Validate to ensure the trigger settings are valid. 
    • You may need to scroll to the top of the Details window to see whether the parameters are valid. 

  • Once the trigger successfully validates, click Apply to close the Resource or Network Directory Details. 

4) Log Message

Before you configure FME Flow to process the shapefile data using a workspace, ensure the trigger behaves as you expect when you add files to the BuildingUpdates folder.

  • Add an Action to the canvas and connect it to the trigger success port. 
  • Open the Action Details and set it to a Log a message action. 

  • For Formatted Message, click the drop-down options, expand Event Attributes, and select Event as JSON.
    • FME Flow will log the JSON message that the trigger sends when it detects an updated or modified file in the BuildingUpdates folder. 

  • Click Apply to save and close the Log Details. 

5) Start Automation in Debug Mode

  • Save the automation and name it Incoming Building Footprints

The FME Flow Automation must be running to monitor the BuildingUpdates folder actively for changes.

  • Click Debug to start the automation in debug mode.
    • Use debug mode here to test whether the trigger works as expected. 
  • A warning will pop up about debug mode. Click Debug to confirm and close the warning. 
    • The automations canvas will update to show it is running in Debug Mode. 

6) Test Automation

While the automation is running, you must add shapefiles to the BuildingUpdates folder to trigger it.

  • Navigate to Resources > Data > BuildingUpdates.
  • Select Upload > Files

  • Upload all the files of the update001 shapefile (.dbf, .prj, .shp, .shx) to the folder from C:\FMEData\Data\Engineering\BuildingFootprints.

FME Flow uploads the files to the BuildingUpdates folder, triggering the Automation.

Note

If you are not using a Safe Software training machine, you can download the source shapefile datasets, then upload one shapefile of updates to FME Flow. 

  • Once the files are uploaded, return to the Incoming Building Footprints automation.
  • Expand the Menu, and select View Debug Log

  • Check for any CREATE messages in the log file. Refresh the log if needed.
    • You should see four CREATE events triggered by the four shapefile files. 

Now you've created a Resource or Network Directory Watch trigger to run an automation when you add or modify files in Resources! This automation will save Jennifer time, as she won't need to check for new files to process each day manually. In the next exercise, you will process each shapefile with a workspace to update the geodatabase. 

Resources

Directory Watch Triggers

FME Flow's event-based triggers monitor events in external applications or within FME Flow and trigger an automation when a specific event occurs. Many of these triggers are directory watch triggers, in which FME Flow monitors a directory for an updated file or dataset. The Resource or Network Directory (updated) trigger monitors an FME Flow Resources or network drive (via a UNC path) for file additions, modifications, and deletions. Other common triggers include the FTP Directory (updated)Amazon S3 Bucket (updated), and Dropbox Directory (updated)

The primary use case for these triggers is to monitor a data storage location for any changes. Once a change occurs, FME Flow triggers the automation to run and passes the file to a workspace to process.  

Note

Some of these trigger protocols have corresponding external action protocols where FME Flow pushes files to the data storage location. For a complete list of trigger and action protocols, see our automations documentation

Automation Modes and Logs

Once you finish building your automation, you must start it to begin actively watching for file changes. FME Flow Automations has two running modes: Debug and Production. You should use Debug mode when building and testing your automation, and then use Production mode once it is built and ready to deploy and run without intervention. 

Debug Mode

While you build and test your automation, you should use Debug mode. The Debug button in the top toolbar starts your automation in Debug mode. 

A warning message appears when you run an Automation in Debug mode. Once you confirm, a message appears on the automation canvas indicating that it is running in Debug mode. You can access the automation log file from the message (A) or from the View Debug Log option in the automations menu (B). While running in Debug mode, FME Flow temporarily stores the automations log files in the FME Flow database. FME Flow clears the log file each time the automation restarts and does not permanently store the files. 

Production Mode

Once you've built and tested your automation, the Start button begins running it in Production mode.

Again, the automations canvas displays a running message. 

To access the log files for your automation running in Production mode, use the automations Menu and select View Log Files or navigate to the logs through Resources > Logs > automations. 

In Production Mode, FME Flow stores the logs for all Automations in Resources > Logs > automations. Additionally, FME Flow combines logs from all automations and separates the files by automation component. For internal and external actions, the log files begin with action_, and for triggers, the log files start with trigger_, and the trigger or action type follows each. For an Amazon S3 bucket trigger, the log file is called trigger_s3watch.log. For an Email external action, the log file is called action_email.log. You may need to filter the logs to find information specific to your automation, as FME Flow combines information from all automations triggered by the same action. The fmeautomations.log file is key and contains metadata about assembling, starting, stopping, and running automations. FME Flow saves the Production logs and removes them only according to the System Cleanup settings. 

The log files significantly differ between Debug and Production modes for FME Flow Automations. It's essential to understand them to avoid information loss and ensure you use the appropriate running mode for your automations. To summarize the differences, here are a few points:

Exercise

Jennifer, a GIS specialist, is working on a project to update a geodatabase with new shapefiles reflecting construction updates. She manually checks a Resource directory for new files daily, but knows she will save time and process the updates faster with an FME Flow Automation.

In this exercise, you will: 

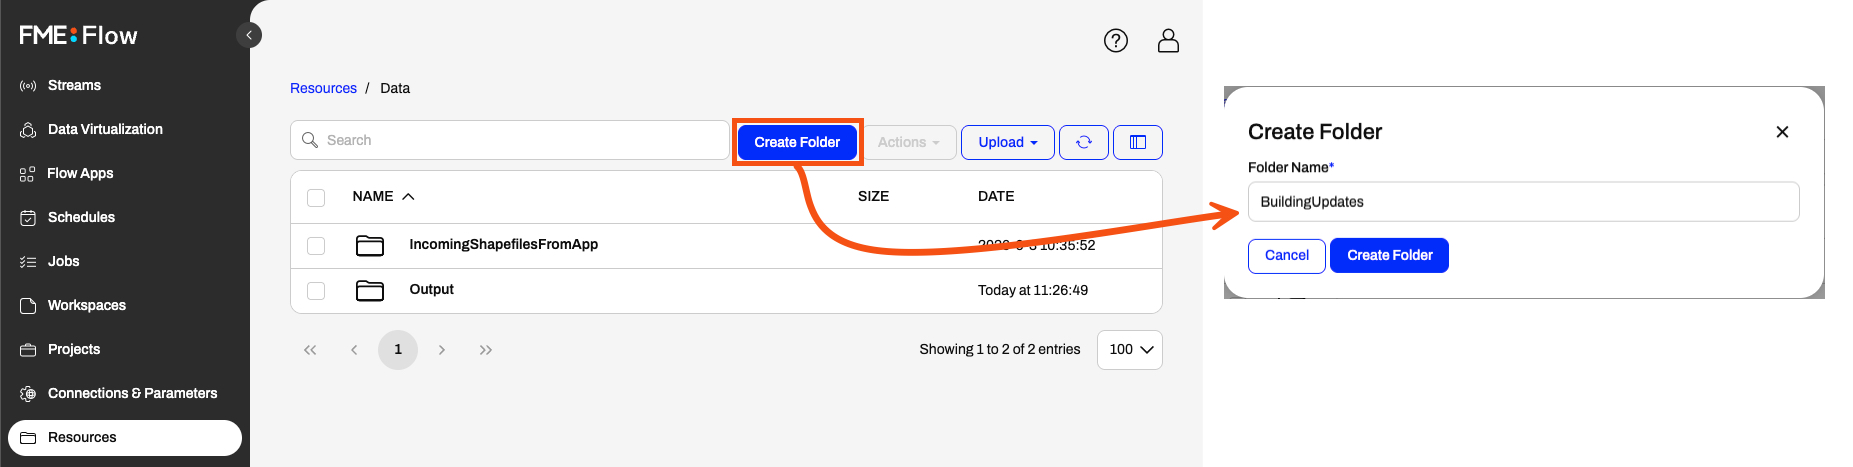
1) Create Resources Folder

Note

You may skip this step if the BuildingUpdates folder already exists in Resources > Data. 

The first step is to create a Resources folder to upload the data.
2) Create Automation

  • Open Automations and select Create to create a new automation. 
    • A new automation opens with a ready-to-configure trigger. 

  • Optional: Expand the Menu options and select Hide Guides to remove the Next Action guides. 

3) Add Resource or Network Directory Trigger

  • Click the trigger icon to open the Trigger Details pane.
  • From the Trigger options, select Resource or Network Directory (updated)

  • For the Directory to Watch parameter, click the ellipsis button to browse FME Flow Resources.
  • Select the BuildingUpdates folder in the Data folder. 

  • Leave the Watch Subdirectories and Watch Folders parameters set to No.
    • You only need to monitor files directly in the BuildingUpdates folder.
  • For the Event to Watch parameter, deselect the Delete option. 
    • Your automation only needs to trigger for new files or file updates. You do not need to update the database if you delete files from this directory.
  • Change the Poll Interval to 5 seconds
  • Click Validate to ensure the trigger settings are valid. 
    • You may need to scroll to the top of the Details window to see whether the parameters are valid. 

  • Once the trigger successfully validates, click Apply to close the Resource or Network Directory Details. 

4) Log Message

Before you configure FME Flow to process the shapefile data using a workspace, ensure the trigger behaves as you expect when you add files to the BuildingUpdates folder.

  • Add an Action to the canvas and connect it to the trigger success port. 
  • Open the Action Details and set it to a Log a message action. 

  • For Formatted Message, click the drop-down options, expand Event Attributes, and select Event as JSON.
    • FME Flow will log the JSON message that the trigger sends when it detects an updated or modified file in the BuildingUpdates folder. 

  • Click Apply to save and close the Log Details. 

5) Start Automation in Debug Mode

  • Save the automation and name it Incoming Building Footprints

The FME Flow Automation must be running to monitor the BuildingUpdates folder actively for changes.

  • Click Debug to start the automation in debug mode.
    • Use debug mode here to test whether the trigger works as expected. 
  • A warning will pop up about debug mode. Click Debug to confirm and close the warning. 
    • The automations canvas will update to show it is running in Debug Mode. 

6) Test Automation

While the automation is running, you must add shapefiles to the BuildingUpdates folder to trigger it.

  • Navigate to Resources > Data > BuildingUpdates.
  • Select Upload > Files

  • Upload all the files of the update001 shapefile (.dbf, .prj, .shp, .shx) to the folder from C:\FMEData\Data\Engineering\BuildingFootprints.

FME Flow uploads the files to the BuildingUpdates folder, triggering the Automation.

Note

If you are not using a Safe Software training machine, you can download the source shapefile datasets, then upload one shapefile of updates to FME Flow. 

  • Once the files are uploaded, return to the Incoming Building Footprints automation.
  • Expand the Menu, and select View Debug Log

  • Check for any CREATE messages in the log file. Refresh the log if needed.
    • You should see four CREATE events triggered by the four shapefile files. 

Now you've created a Resource or Network Directory Watch trigger to run an automation when you add or modify files in Resources! This automation will save Jennifer time, as she won't need to check for new files to process each day manually. In the next exercise, you will process each shapefile with a workspace to update the geodatabase.